
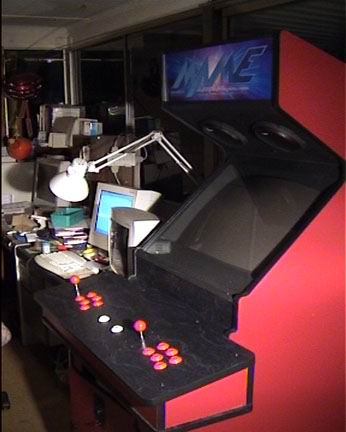
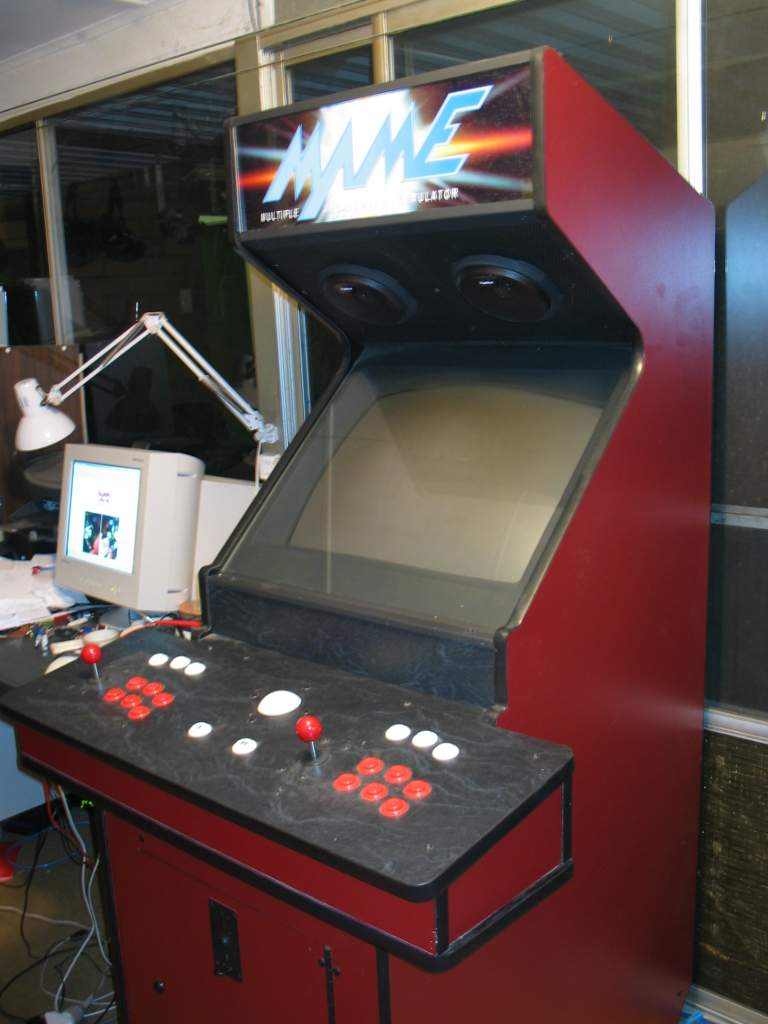
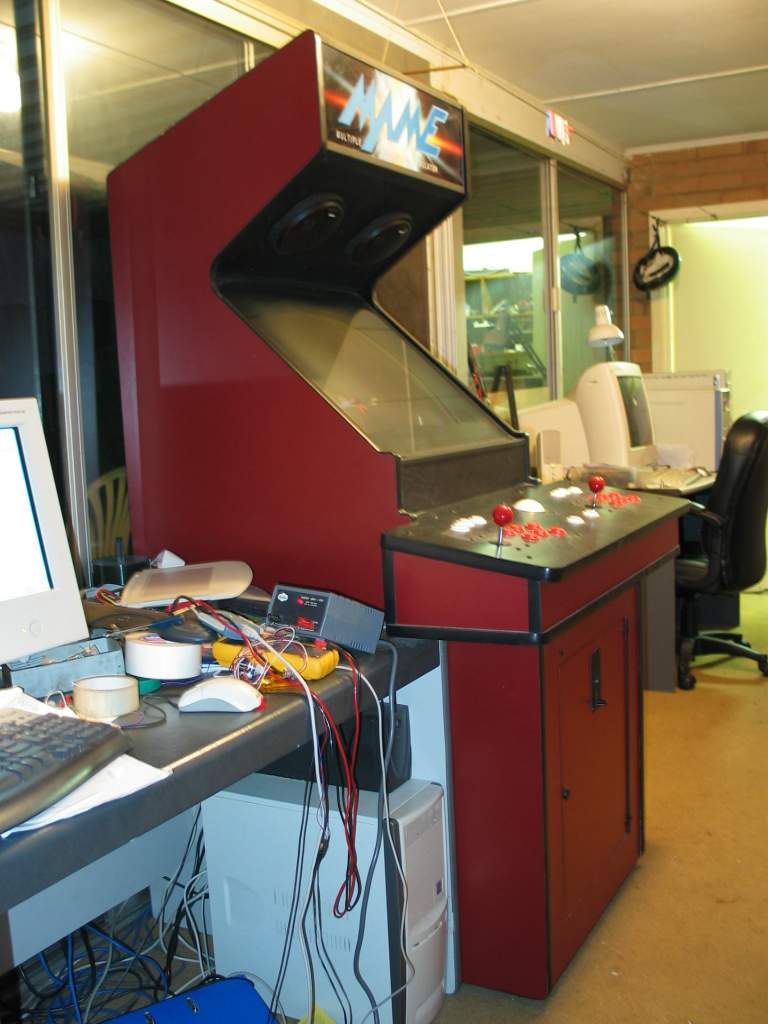
Welcome to my web page dedicated to my MAME cabinet
More pictures of my cab

If you have no idea of what MAME is then you better head over to www.mame.net, and realise what you have been missing out on.
The total project cost me about $1500 AU and took me around 4 months to complete.
How it all started
Basically I first heard about MAME by randomly stumbling onto a MAME site. After realising what MAME was all about, I downloaded a handful of games that I remembered playing and it was quite exciting being able to play them like in the arcades. But as always we want more, and so I went through lots of MAME sites looking for the original artwork, looking for recommended video settings just so my PC monitor would look more authentic, and basically anything that would get the game as original as possible. This is when I saw my first MAME cab, the whole idea of being able to play 3000+ games on an original arcade cabinet was so amazing that I immediately started researching (Googling) MAME cabs. Book marking sites which had cabinet designs and dimensions, sites which sold joysticks and buttons, and basically any site which had a MAME cab on it. Obviously the biggest draw back was the cost, being a full time student I couldn't afford everything that was involved in making a full sized cab and so my original project was actually a desktop arcade stick similar to the X-Arcade, but during the university holidays I managed to get an alright job and could now afford to build my own MAME cabinet. Since I had no carpentry skills the easiest method was to buy an original cabinet and convert that into a MAME cab. After looking in the newspaper and at various arcade sites (which are both quite expensive), I luckily found out about a full working JAMMA cab in a second hand yard for $350. After having a look inside and unsuccessfully trying to get the price lower, I bought it; and from there is how my MAME cab project started.
Specs of the original cab
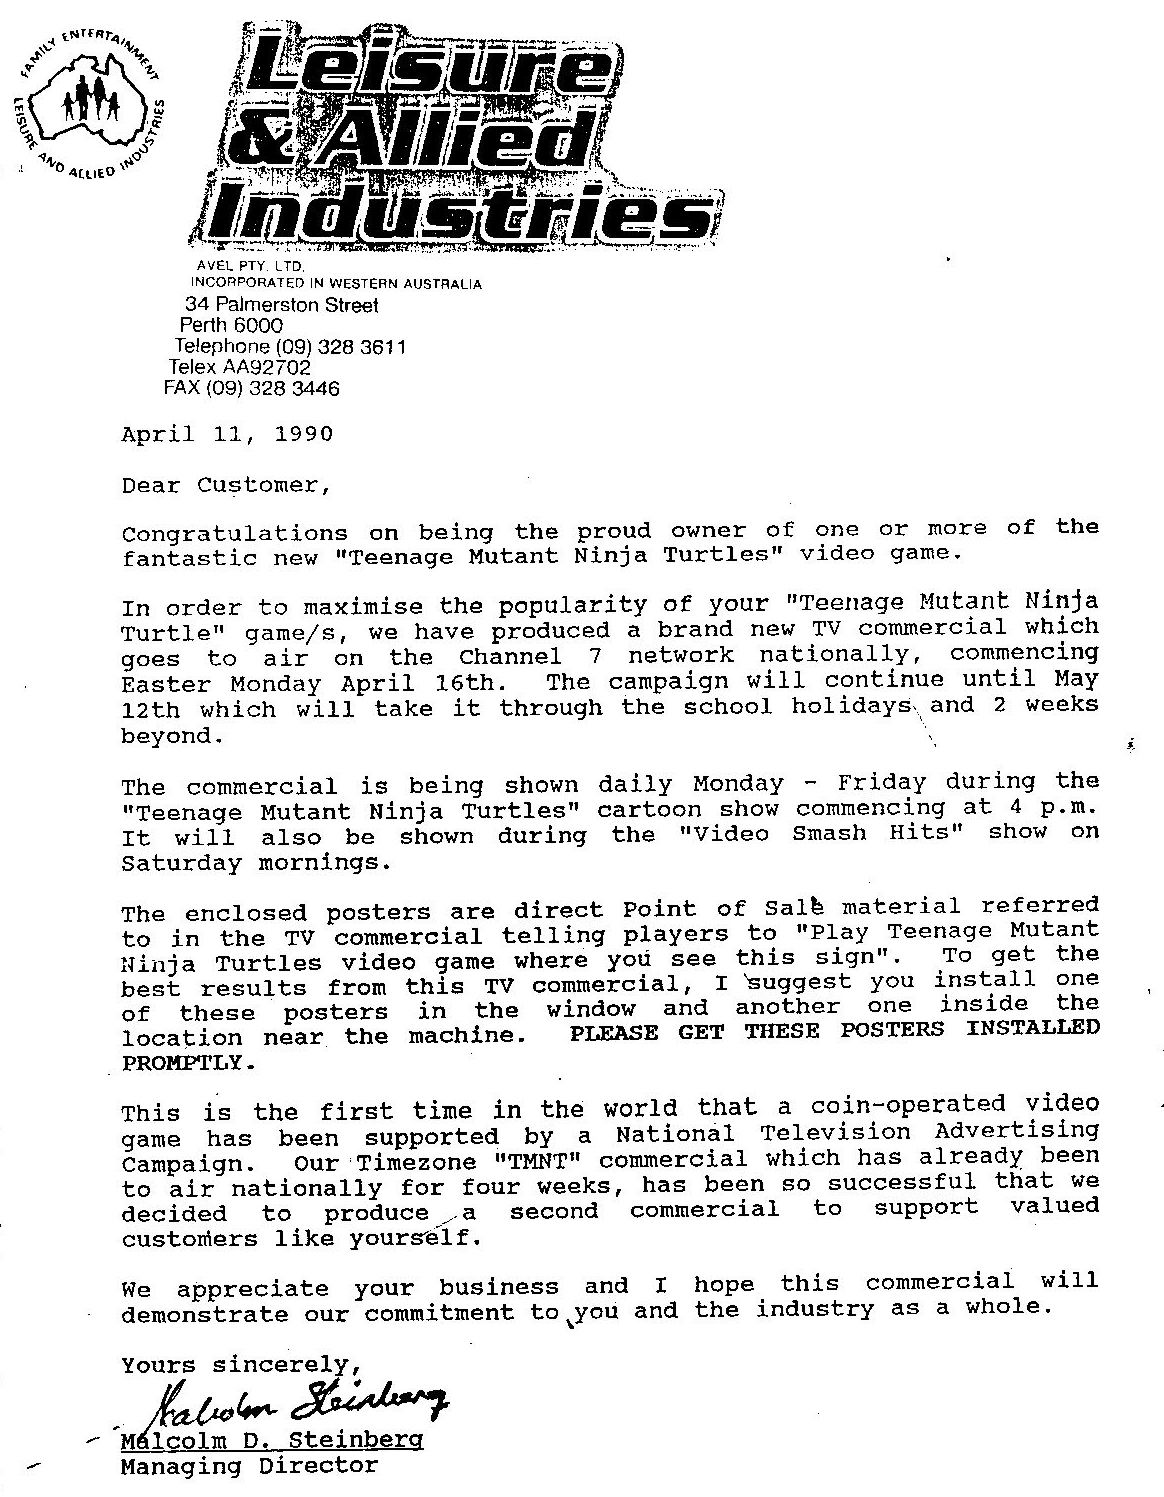
Originally the cab was a Leisure & Allied Industries (LAI), Teenage Mutant Ninja Turtles (TMNT) video game that was bought by Timezone. I had found the original documents which came with the cab, which included Block Diagram, and original letter to Timezone from LAI, dated April 11, 1990. through out its life the cab had been converted into numerous games, and the game that was currently in it was Air Buster. One of the biggest things I regret is not taking photos of the original cabinet. If any one has photos of the same looking cabinet; preferably lime green in colour, please email me them.
Features:
- 26" KORTEK color raster display monitor, does have some burn in
- Air Buster PCB ($75)
- 2 joysticks, 10 buttons, 4 dummy buttons ($54)
- Sentinel Coin Controls Mech, 8 coin Validator ($52)
- JAMMA power supply ($41)
- SUNRISE Multi Credit Board Mk4A ($19)
- 8" REDFORD extended range loudspeakers 6W RMS, 10W MAX
- coin meter
- Fluoro Lighting
- Distribution box, included 110v and 12v transformer
Numbers in brackets are how much I sold each of the components for on eBay, hence I was left with a full working 26" original arcade monitor and original arcade cabinet for just over $100, which isn't bad.
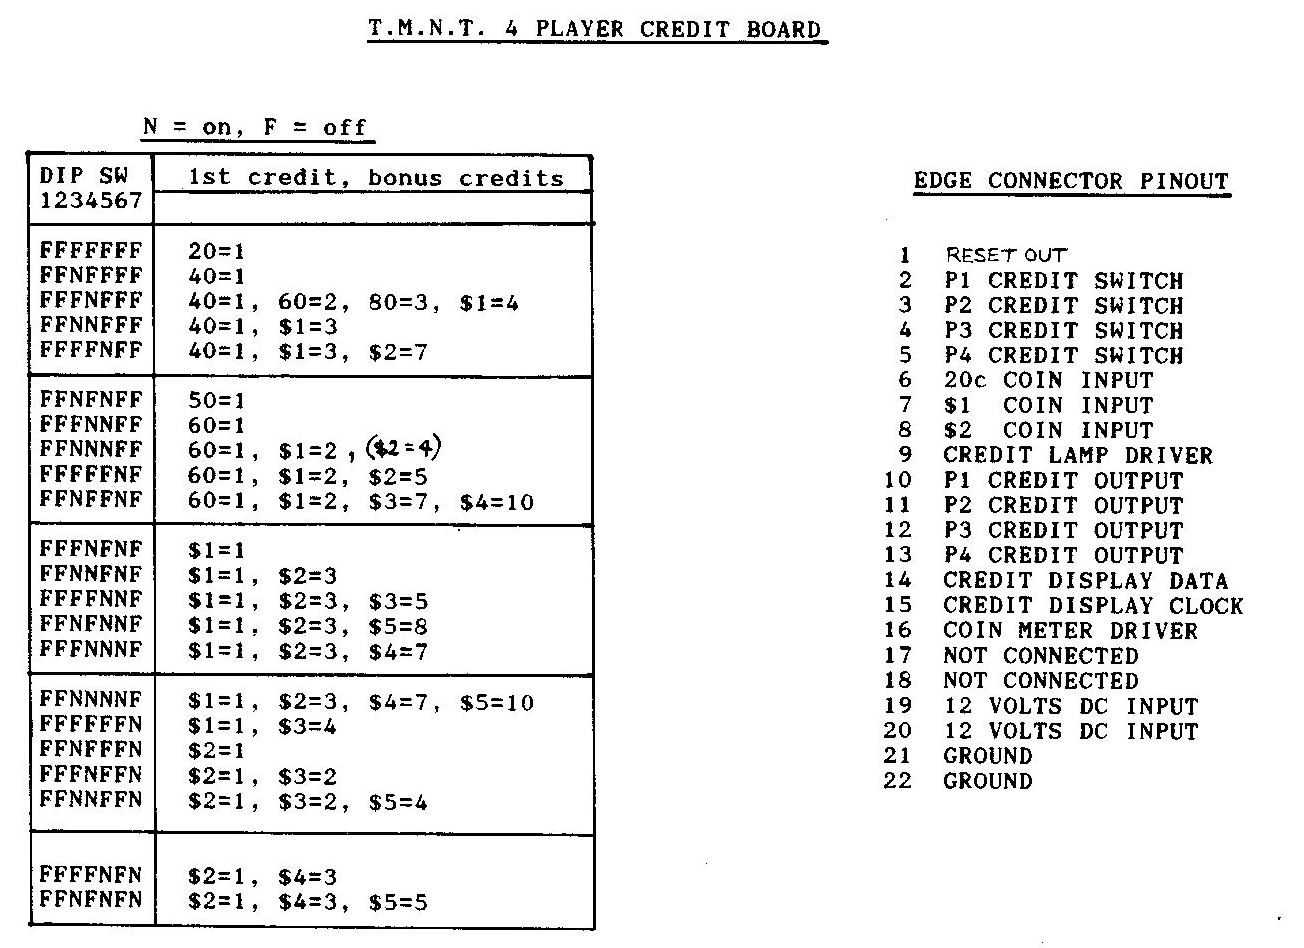
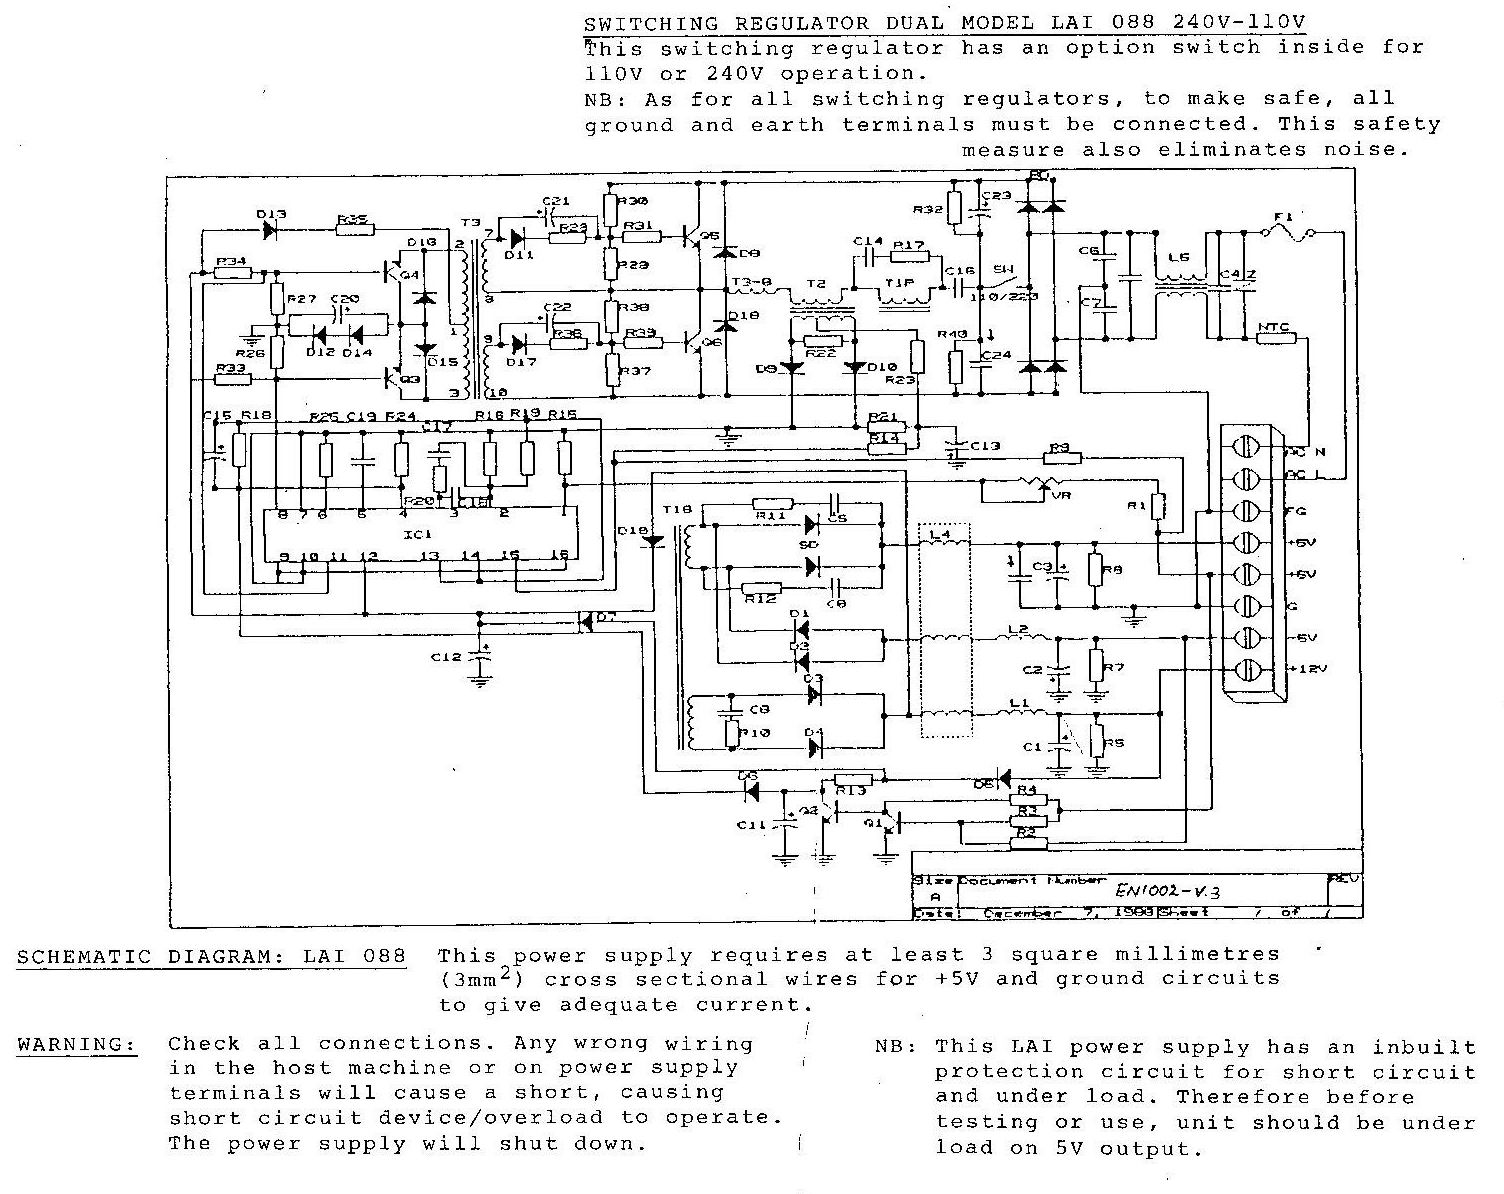
Scans of original documents:
- LAI TMNT Block Diagram
- TMNT 4 Player Credit Board
- LAI Letter
- Switching Regulator Duel Model LAI 088 240V-110V
- KORTEK Color Raster Display Monitor - Instruction Manual
Restoration and Converting
Being over 10 years old the cabinet did have its expected share of exterior dents and scratches, and hence the hardest decision of the whole project was whether to re-laminate the whole thing. Not only was it going to be a bitch to re-laminate but the sheet of Formica required to do the job was going to cost $270!, which was almost 3 times as much as the cost of the cabinet I now had left. In the end it was decided that the lime green colour was just unbearable and a burgundy colour was chosen to cover it. The process of re-laminating was the most time consuming, with each surface needing to be sanded and cleaned. After the laminate was glued on, the edges needed to be routed and new T-moulding (bought from Galvins Hardware in WA) was inserted around the edges. All bolt and screw heads where spray painted black to give them a new appearance. Front and back key locks where replaced since the original ones did not come with their keys, and these where painted black as well. The monitor glass was replaced since the original had scratches as well as the Perspex marquee which was also replaced. A classic looking coin mech was bought from OzStick, and its face painted black. Somewhere in the whole process of restoring I managed to loose 2 pieces of metal which held the glass in place, so I had to get them made as well. By now the cabinet was looking very presentable.
- Formica
- $270
- T-moulding 15m x 22mm
- $22
- Glass
- $45
- 2x Perspex marquees (1 matt, 1 clear)
- $22
- 2x key locks
- $20
- Coin mech
- $50
- 2x spray paint
- $20
Control panel and Computer interfacing
The original control panel had the standard 2 joystick and 6 button template, plus holes for the 1 and 2 player buttons. The colour was orange so that was laminated with an offcut of black marble Laminex. New ball top joysticks, 12 red buttons, and a 1 and 2 player buttons where all bought from OzStick. being a JAMMA cabinet and having an original monitor, I wanted to interface it to my computer with no hassles, for this reason it was decided to buy a J-PAC made by Ultimarc this was again bought from OzStick as well as a JAMMA wiring harness to make interfacing the controls and monitor easier. All that was left to do was to mount the buttons and joysticks, and then connect the lugs of the wiring harness to the switches. Since most JAMMA boards only use 3 buttons on each player, I did have to crimp several more lugs (bought from DSE) onto separate wires in order to connect them to the J-PAC screw terminals.
- J-PAC
- $145
- JAMMA harness
- $33
- 2x ball top joysticks
- $44
- 14x buttons
- $68
- Laminex offcut
- $22
Finishing Touches
The original 8" Redford speakers where removed due to their pathetic 10W sound output, and replaced with 6"; 3-way; 100W Sony X-plod's. I went around various car audio stores looking for 8" speakers, but the only ones that existed where too expensive, hence I went for the X-plod's but needed to make 2 wood cutouts in order to mount them in an 8" hole. The red and black colors of the speakers matched the rest of the cabinet well but the silver bezel was painted black. In order to power the speakers I bought a 2 channel 220w Sony amp. The amp was connect to the 12V transformer that was originally used to power the JAMMA power supply. The input to the amp was taken directly from the computers sound card. After looking at various designs of MAME marquees on the net, the main problem was the images where not good enough quality. In the end I managed to find a high resolution marquee which also looked good. After a bit of editing to get the proportions the same as my cabs (620mm x 205mm) I then split the image into 3 and had them laser printed on A4 at university. The marquee was probably the cheapest thing of the whole project and still looked good.
- Sony amp and speakers
- $260
- Marquee
- $5
The Future
After a lot of playing around with my Matrox G400, I've decided to go the easy way and buy an ArcadeVGA card, hopefully it will arrive soon for the UK. I am also wanting to install a relay which turns on and off the monitor when the computer turns on and off and a track ball so that I don't have to keep using a mouse. Finally in the distant future I will build a cocktail cabinet, since they have that cool look.
Update: 4 years later, 2005
After 4 years since originally creating my MAME cabinet there have been a number of improvements. The main one being the use of the ArcadeVGA video card made by Ultimarc, this card with a J-PAC makes converting an existing JAMMA cab so easy. Just plug it in and your monitor will display everything a normal computer monitor would display. Actually; it's great with Windows 98, but it's tricky to install with Windows XP. I am currently using XP because I am more familiar with it and 98 use is dying.
The problem with XP and the AcradeVGA is that the ArcadeVGA can only work with its provided drivers, XP however; thinking that its making your job easier will install its own packaged drivers that obviously won't work, as soon as you boot into windows you will get the BSOD. There are supposed to be ways around this like booting into safe mode, but I can't remember having any luck with that. My initial way around this was to install XP with any video card, and then switch it with the ArcadeVGA. This worked nicely but was a pain, in that the case needed to be opened every time. My next solution was to buy a motherboard with onboard VGA, thinking that instead of switching it manually I could do this in BIOS. However I found out that it did not work that way. My current solution I am using is an ArcadeVGA and a PCI video card. This is great because of two things; firstly I can install XP with the PCI card as my primary display and hence no problems installing the ArcadeVGA drivers, I can then select the ArcadeVGA to be my primary display and XP boots onto my arcade monitor no problem; secondly with a KVM switch I can switch over to my MAME cab's PCI card and use it as a second computer without trying to read fuzzy text on the arcade monitor, it also makes choosing MAME games so much easier.
I have upgraded my $5 laser printed marquee to one that I bought from EMDKAY, mainly because the old one being out of three pieces or paper, lines of light could be seen at the joints. I managed to pick up a trackball from eBay, it plugs into the mouse port and is great for games like Golden Tee.
- ArcadeVGA
- $160
- EMDKAY marquee
- $40
- Trackball
- $100
Update: 2016
After having the MAME cab sitting in the corner for a while, I decided to take the easy way out and install a 26" LCD monitor. The Asus VW266 26” widescreen LCD monitor fit the width perfectly. I also replaced the JPAC with an inexpensive USB joystick encoder. Works really well.
Links
 |
OzStick have been great during the whole building of my MAME cabinet, I've bought numerous parts from them.. They have a huge range and their prices are the cheapest I've found in Australia. If building a cab definitely buy any parts from them. Tho I'm not too sure about their pre-made Desktop Joysticks, they look bad. |
Arcade@Home
Build Your Own Arcade Controls Message Forum
Build Your Own Arcade Controls
Easy MameCab
easyEmu
EMDKAY - MAME marquees
EmuAdvice
Filtek Australia - Another Australian arcade parts seller, but prices are a rip off.
FreeMameRoms
KLOV - Killer List of Videogames
MAME - The official MAME site
MAMEWAH
Mon-ARC
PURPLE MAME
ULTIMATE ARCADE CONTROLS - seller of JPAC and ArcadeVGA
For something a bit more on the smaller side, check out my arcade stick
For any comments/questions/anything at all, contact me.
![]()